A hands-on guide to creating a blog with Hugo and GitHub Pages.

Prerequisites
- A GitHub account
- Installed Microsoft Visual Studio Code
- Installed Git
- Installed Snap
If you are not familiar with Git, you can refer to the simple guide.
Installation
Install Hugo
sudo snap install hugo
hugo version # test installation
Install PaperMod Theme
mkdir -p homepages && cd homepages
hugo new site mywebsite --format=yaml && cd mywebsite
git init
git submodule add --depth=1 https://github.com/adityatelange/hugo-PaperMod.git themes/PaperMod
echo "theme: PaperMod" >> hugo.yaml
After the installation, you should have a directory structure like this:
.
└── mywebsite
    ├── archetypes
    ├── assets
    ├── content # blog posts
    ├── data
    ├── hugo.yaml # configuration file
    ├── i18n
    ├── layouts
    ├── public
    ├── static
    └── themes
You can test the blog locally by running:
# in the mywebsite directory
hugo server -D
Create the first blog locally
Create a new blog post:
hugo new about.md # create content/about.md
Edit the content of the file:
---
title: "About"
date: 2025-11-22
draft: false
ShowToc: true
author: "Jason"
tags: ["about"]
---
Hi! I am a new blog post.
Edit the configuration file:
baseURL: https://AgentScaleLab.github.io
languageCode: en-us
title: Jason'Log
theme: PaperMod
params:
  defaultTheme: dark
  ShowReadingTime: true
  ShowAllPagesInArchive: true
  ShowWordCount: true
  homeInfoParams:
    Title: "\U0001F44B Welcome to Jason'Log"
    Content: >-
      Hi, this is Jason. I'm documenting my learning notes in this blog since 2025.
  socialIcons:
    - name: email
      url: 'xxx@outlook.com'
    - name: github
      url: 'https://github.com/AgentScaleLab'
menu:
  main:
  - identifier: about
    name: About
    url: /
    weight: 20
Build the blog locally:
hugo server -D
If you want to organize your blogs in folders, following the steps below:
Organize your blog posts in folders:
content/
├── posts
├── projects
└── tags
Modify the configuration file:
# hugo.yaml
...
menu:
  main:
  - identifier: posts
    name: Blog
    url: /posts/
    weight: 20
  - identifier: projects
    name: Project
    url: /projects/
    weight: 20
  - identifier: tags
    name: Tags
    url: /tags/
    weight: 20
Deploy to GitHub Pages
Create a new repository named YOUR-NAME-ON-GITHUB.github.io on GitHub.
Link the local repository to GitHub:
cd mywebsite
git remote add origin git@github.com:AgentScaleLab/AgentScaleLab.github.io
Push the local repository to GitHub:
git status
git add .
git commit -m "first commit"
git push -u origin main
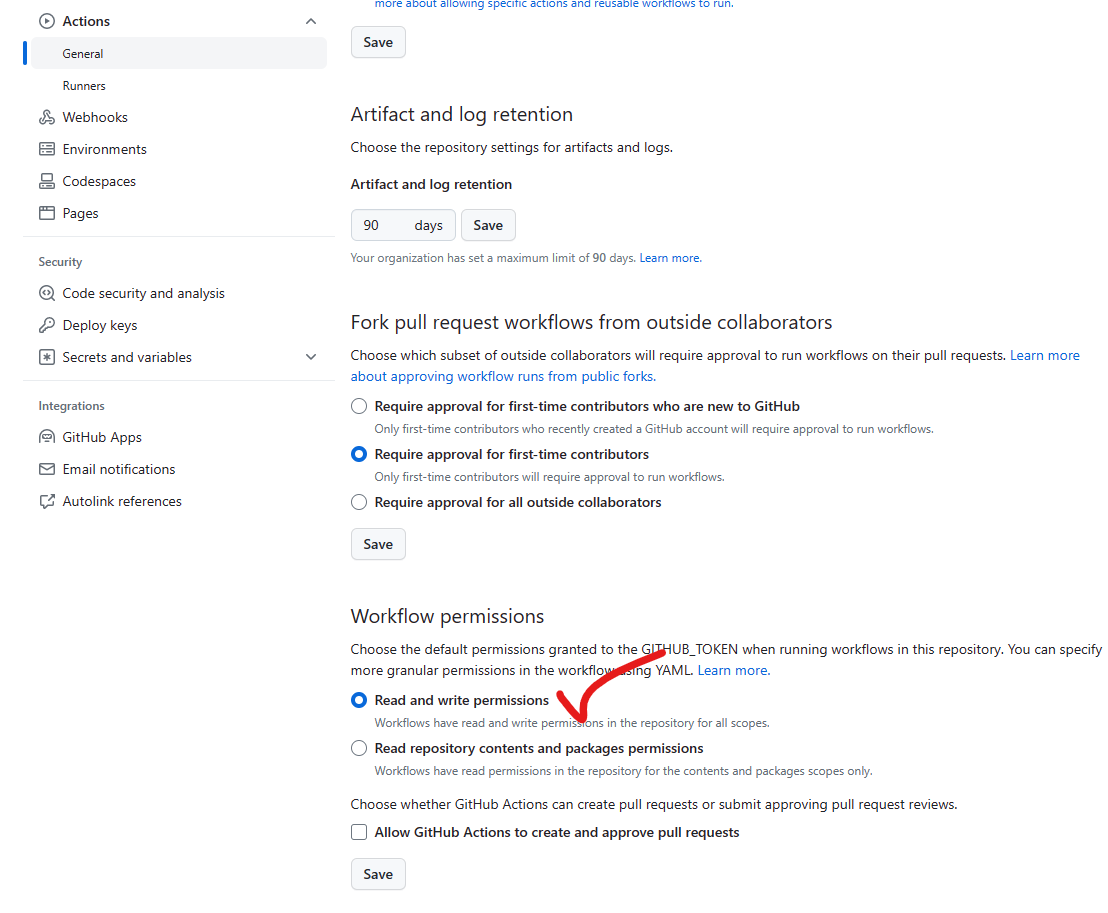
Change the settings of the repository on GitHub:
- Enable “Read and write permissions” under “Actions” -> “General”.
- Under “Pages”, set the source to “Deploy from a branch” and select “Github Actions” as the workflow.
- Search and click “hugo” template workflow.
- Under “Actions”, click “Run workflow”."
If the deployment is not successful, you can modify the workflow file in the .github/workflows folder. The template workflow file is as follows:
# Sample workflow for building and deploying a Hugo site to GitHub Pages
name: Deploy Hugo site to Pages

on:
  # Runs on pushes targeting the default branch
  push:
    branches: ["master"]

  # Allows you to run this workflow manually from the Actions tab
  workflow_dispatch:

# Sets permissions of the GITHUB_TOKEN to allow deployment to GitHub Pages
permissions:
  contents: read
  pages: write
  id-token: write

# Allow only one concurrent deployment, skipping runs queued between the run in-progress and latest queued.
# However, do NOT cancel in-progress runs as we want to allow these production deployments to complete.
concurrency:
  group: "pages"
  cancel-in-progress: false

# Default to bash
defaults:
  run:
    shell: bash

jobs:
  # Build job
  build:
    runs-on: ubuntu-latest
    env:
      HUGO_VERSION: 0.146.0
    steps:
      - name: Install Hugo CLI
        run: |
          wget -O ${{ runner.temp }}/hugo.deb https://github.com/gohugoio/hugo/releases/download/v${HUGO_VERSION}/hugo_extended_${HUGO_VERSION}_linux-amd64.deb \
          && sudo dpkg -i ${{ runner.temp }}/hugo.deb
      - name: Install Dart Sass
        run: sudo snap install dart-sass
      - name: Checkout
        uses: actions/checkout@v4
        with:
          submodules: recursive
      - name: Setup Pages
        id: pages
        uses: actions/configure-pages@v5
      - name: Install Node.js dependencies
        run: "[[ -f package-lock.json || -f npm-shrinkwrap.json ]] && npm ci || true"
      - name: Build with Hugo
        env:
          HUGO_CACHEDIR: ${{ runner.temp }}/hugo_cache
          HUGO_ENVIRONMENT: production
        run: |
          hugo \
            --minify \
            --baseURL "${{ steps.pages.outputs.base_url }}/"
      - name: Upload artifact
        uses: actions/upload-pages-artifact@v3
        with:
          path: ./public

  # Deployment job
  deploy:
    environment:
      name: github-pages
      url: ${{ steps.deployment.outputs.page_url }}
    runs-on: ubuntu-latest
    needs: build
    steps:
      - name: Deploy to GitHub Pages
        id: deployment
        uses: actions/deploy-pages@v4
Update the blog posts
cd mywebsite && git pull # make sure the local repository is up to date
# modify the content in the content/ folder
git status # check the changes
git add .
git commit -m "update blog posts"
git push origin main
Notes
- Hugo only shows the articles that are published before the current date.